Sunday, September 22, 2013

Purist vs Strobist

A lot of photographers I know likes to shoot available light.

I prefer flash.

So, which one is better?  Ethical?

For me, both  are.

Shooting with available light, to some is the  only way to go.

Not for me, I am shooting both. It really depends on how I like my photos to look.

I will try to differentiate the two by posting sample photos.

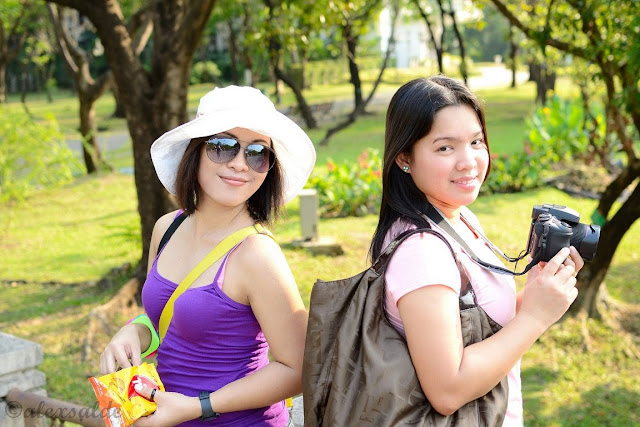
Purist style


The photo above is shot using the ambient light only. Purist style, no fill flash.

The sky is  a little gloomy, light is nice and diffused, there is no need for me to use flash.

This gives a more airy look with nice natural colors.


Strobist style


The above photo is taken seconds after the first photo.

I dialed the exposure down a bit, then lighted Lyn with a single flash at camera left.

This gives a more subdued look and gives more focus on the subject.

Also, notice that the colors of the background are different now?


It is really up to you


For me, using both ways are okay. One light is natural, the other is man-made. 

Both looks good too.

It really depends on you and the feeling that you want to convey on your photographs. 

To stick to only one way is limiting yourself.

To be a 100% purist is losing the opportunity to be more creative.

To be a 100% strobist is failing to take advantage of a beautiful natural light. 

To be using both is great. You will have as many possibilities of conveying your messages through your photographs. 

Learn how to use both. 

Cheers!

Alex

Saturday, September 21, 2013

Take that flash off your camera!

Bouncing our flash is a good way to soften our lights, but if we keep on using it all the time, all of our image will look the same.

Soft, pleasant and even light.Yeah it looks good...but..uhm..boring! Kinda like "meh".

I always mention that I prefer to take my lights off my camera.

Why is that?

Because with off camera flash we can create dimensions in our image.

We can change our light's direction.

We can play with shadows and highlights.

Blah blah blah...

Here's how


There are a lot of ways to take our flashes off our cameras. 


A cord used to attached your flash to your camera's hot shoe. 


2. Radio triggers

One piece you attached to your camera's hot shoe and the other piece to your flash.


3. Using optical slaves

Using our pop-up flash to trigger our off camera flashes. 


The two flashes above was triggered by my pop-up flash. 

Remember, always buy flashes with optical slaves. It's great and convenient. 

And don't forget to use  light stands for your flashes.


They are cheap and very light to carry. They are very useful to hold our lights.

Or you can also use an assistant to hold your lights for you.

But light stands are more reliable, non-complaining and cheaper. (In my opinion)


So why again should we bother taking our flashes off our camera? 


Answer: For us to be able to change our light's direction.


In the photo above, I placed my light on camera right using a light stand. 

By changing the direction of our light sources, we created shadows. That gave our photo dimensions.

It doesn't look flat, more like 3D.

This is the bread and butter stuff of flash photography.


In this photo I placed my  light on camera left. The shadows will tell you.

Again, it adds dimension in our photos. It create shadows and highlights. It looks 3D compared to a flat direct on camera flash.

It is a good habit, it trains us to be more creative.

It makes us think more about our lights.

And by changing the direction of our lights, we change the directions of our shadows. We add emotions, tensions and drama to our photos.

We are like painters with our brushes when using our lights off camera.

Take that flash off your camera!

Cheers.

Alex

Thursday, September 12, 2013

Bouncing your flash


Bouncing flash off walls and ceilings is a very helpful trick to use indoors and in some instances outdoors. We all know that direct flash is harsh and hard. Bouncing it will make our light softer and evenly spread.

This is a neat trick to learn.  As long as you have a white-colored surface to bounce your light with, you'll be alright.


Bouncing off ceilings


This is the most commonly used bouncing technique. You can use this indoors anytime, as long as the ceiling is white and not too high for your flash to reach.

Using this technique, you can always get a nice and soft light that is evenly spread..

This photo of baby Chelsea was taken with the flash bounced at the ceiling.


Always remember that the ceiling should be white, the color of your bounce surface will influence your light.

The height of your ceiling will also affect your light intensity. The higher the ceiling, the weaker your light will be.

You can manually adjust the flash power to determine the right amount of light hitting your subject. This is one reason why I love to adjust my flashes manually.


Bouncing off walls


Same technique but instead of bouncing up at the ceiling, we will bounce our flash at our walls. The source of  our light will come from the sides this time.

Nice to use indoors and outdoors. Any wall or white surface will do. 


Again, always remember that the color of the bounce surface will influence the color of your light. 

The distance of the wall to your subject will determine the intensity of the light. 

You can adjust light intensity manually on the flash, or you can change the subject's distance from the wall. 

Shot below is a photo of Lyn taken with the flash bounced at the wall on her right. 


Conclusion


Bouncing your flash is a nice little trick to keep under your sleeves. 

The images you'll produce using this technique will be more pleasing to the eyes than a direct nuke-em-till-they-glow flash. 

In fact, you can use this technique using different kinds of surfaces. It could be a white shirt, a white board or a white car. You get my drift?

You can use colored surfaces too if you want, depending on the look you're after.


I love to bounce my light during events and parties indoors.


Try using this and you'll create good lighting.

This is one advantage of using external flashes. You can change the direction of your flash.

Next time, we will talk about getting your flash off your camera.

Cheers!

Alex


Thursday, September 5, 2013

Little things matters


Little things seems nothing, that we ignore them. Like those little bees, which individually seems useless, but all together produces sweet honey.


This one I think is a fly...


Beautiful little creatures..

Wednesday, September 4, 2013

Introduction to external flashes


This is where the fun starts.If you really want to be more creative in your photography, this topic is for you.

Using external flashes can open up a lot of lighting possibilities and creativity. This will help transform your photos from mere snapshots to pieces of arts.

Cant we just shoot available light? 

Of course we can! I have been doing that for the last couple of years.

But with available light, we only have one light to base our exposure from. There is only one correct exposure, or else you'll either have an underexpose or an overexpose image.

But if we carry additional light with us as an option, it will give us endless possibilities. Photography is defined as painting with light. Let's consider our flashes as our brushes then.

Two kinds of external flashes


There are two basic types of external flashes, the TTL and the manual flashes.

The difference is that in TTL you let the camera adjust the light power output of the flash while in manual flashes you do it yourself manually.

I prefer using manual flashes. For me, it is like cooking. You put a little of this and that till you are satisfied with its taste.

Uses of external flashes


I will run you through to some of the uses of external flashes. We will talk about this techniques in the coming articles. 


You can bounce your light on ceiling or walls to get a nice and evenly spread soft light. 


Like this shot of little Chelsea and her dad. Light bounced at the ceiling, it gives an even and pleasant light. 


You can take your light off your camera and put it in a 45% angle to your subject.


My wife lighted with an off camera flash, 45% at camera right. 


You can use it as a very effective fill light to avoid shadows outdoors. 

Without fill, this photo will have shadows on their faces and some other areas not reached by the sun's light


You can even include it  in your frame.


Well...


You can take a simple and quick one light set up portrait like below.


This photo of coach Ariel was lighted by a single flash handheld by yours truly at camera left. 


Or you can be a little bit more creative like this.

Two light set up. Flash with umbrella lighting Lyn, bare flash at the back lighting the flowers.


And this


White balance tweaking made the sky bluer. Itthipol was lighted by a single flash at camera right, gelled to balance the color temperature. 


I can go on and on, the possibilities are endless.

I encourage everyone that wants to try new things and be more creative in their photography to include off camera flashes in their arsenal.

 They are fun, exciting and challenging.

Let's dwell with some techniques in lighting in the coming articles.

Cheers

Alex